
Help guide

Every step, in order.

The same guide that ships inside the app, on one page. If you only read one thing, make it boxing your batter — it's the step that decides how good the rest gets.

Getting started

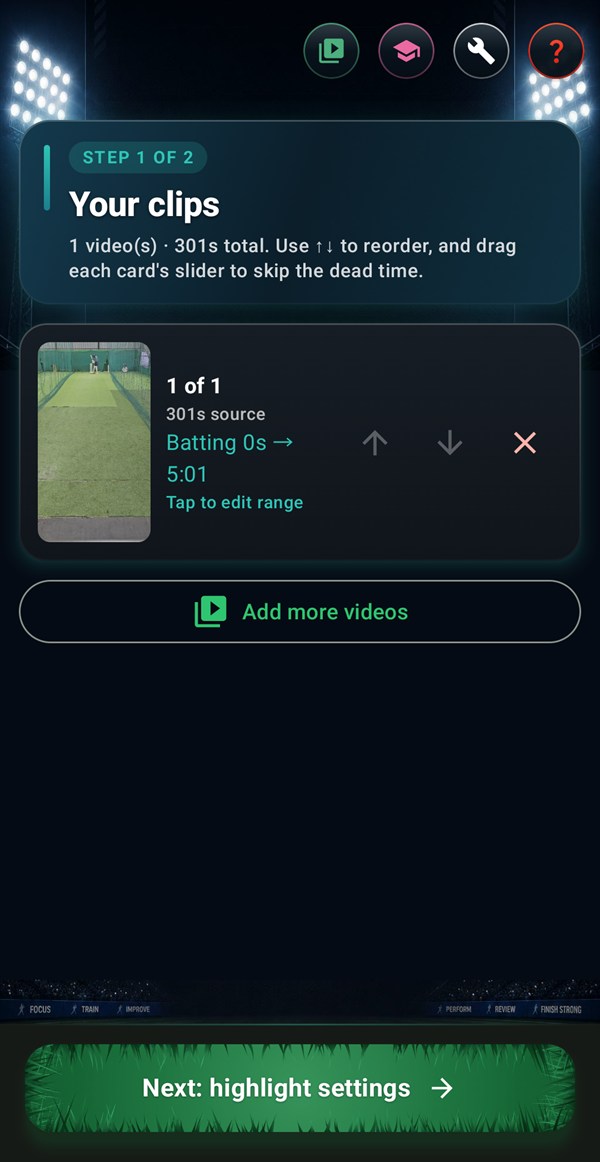
The CricCuts home screen: two net videos added as cards, each with an edit-range slider, an "Add more videos" button, and "Next: highlight settings".
STEP 01 · GETTING STARTED

Add your match videos

Pick one clip or grab several at once — CricCuts treats them as one long match, in whatever order you arrange. Filmed across a few recordings? Add them all and line them up with the arrows.

  • Pick one or many in a single go
  • Add more any time with Add more videos
  • Reorder with the ↑ ↓ arrows
  • Remove one you don't want with ✕
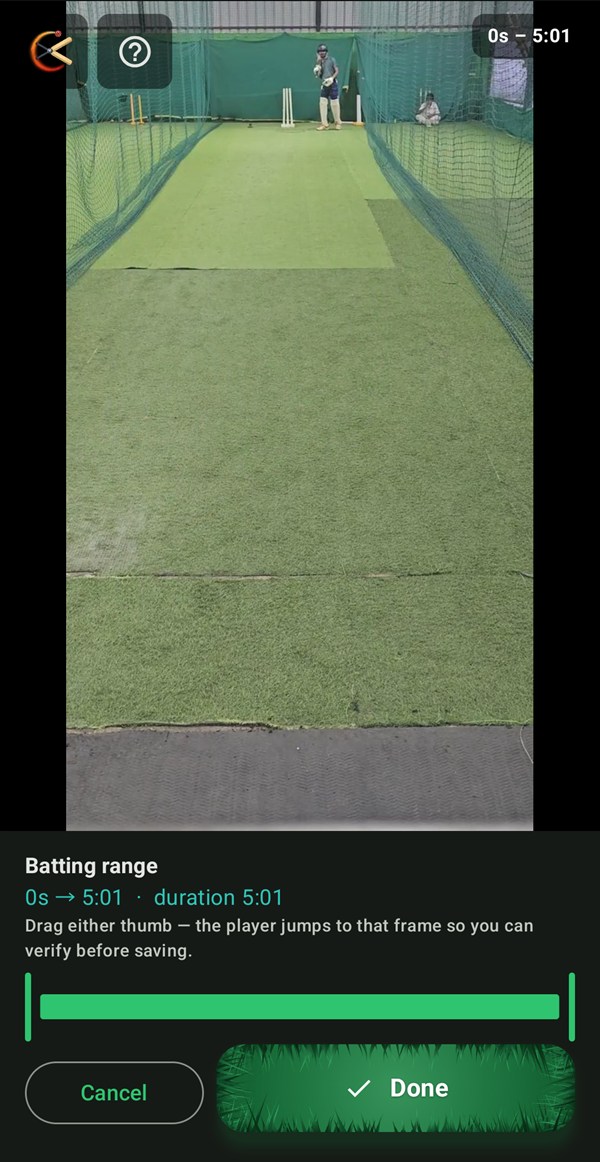
Range editor · drag to set start & end
STEP 02 · GETTING STARTED

Skip to the batting window

Most recordings have long idle stretches before and after play. Tap a clip's edit range, then drag the two handles to mark just the part with the action — the preview jumps to wherever you're dragging, so it's easy to land on the right spot. Happy with the whole video? Just leave it.

  • Drag two handles to set start and end
  • The preview jumps to the frame as you drag
  • Set a range per video
  • Optional — uses the full video by default

Worth doing. Trimming out the idle stretches is the single easiest way to make analysis faster and the reel cleaner.

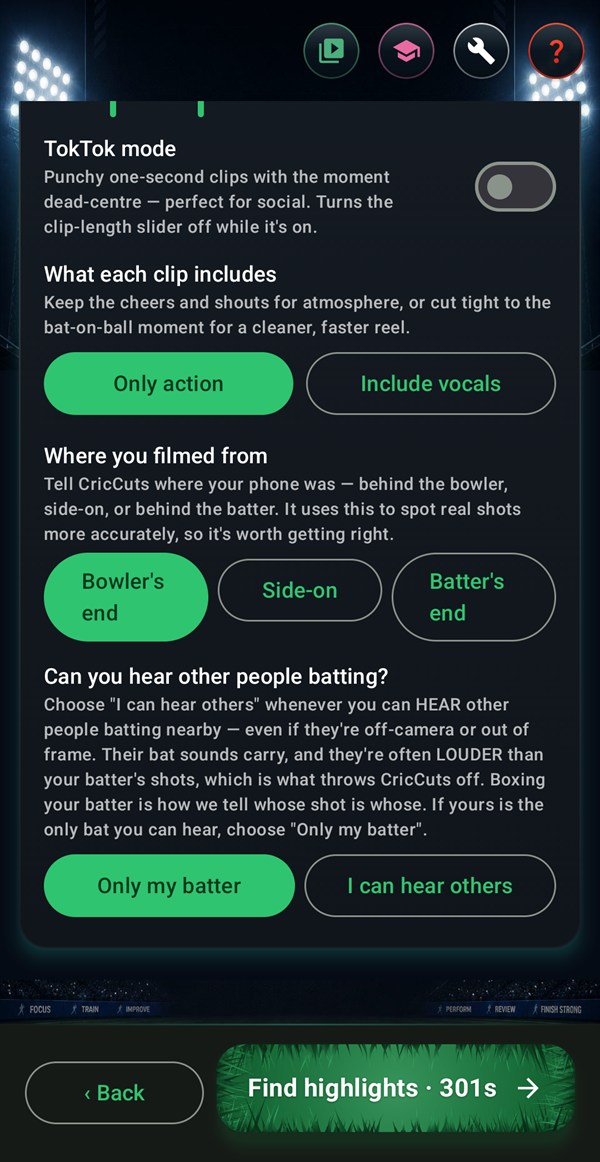
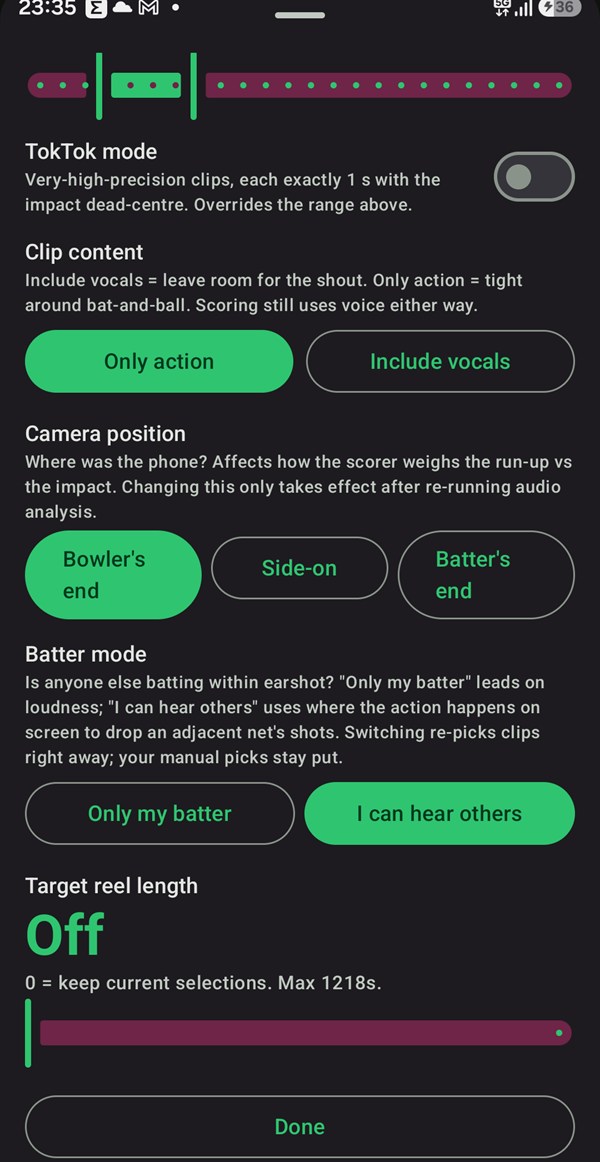
The Highlight settings choices: "What each clip includes" (Only action / Include vocals), "Where you filmed from" (Bowler's end / Side-on / Batter's end) and "Can you hear other people batting?".
STEP 03 · GETTING STARTED

A few choices shape your reel

Step 2 of the import. Decide how long each clip runs and whether to keep the crowd's reaction or cut tight to bat-on-ball. Two are worth getting right — Where you filmed from and Can you hear other people batting? — because both change how CricCuts reads your footage.

  • Clip length — quick cuts or longer moments
  • What each clip includes — Only action, or Include vocals
  • Where you filmed from — Bowler's end, Side-on or Batter's end
  • Can you hear other people batting? — Only my batter, or I can hear others
  • TokTok mode — punchy one-second clips for social

Read this one carefully — it's about sound, not what's on screen. Pick "I can hear others" whenever another bat is audible nearby, even if they're off-camera. Their bat sounds carry, and they're often louder than your batter's shots. If yours is the only bat you can hear, pick "Only my batter".

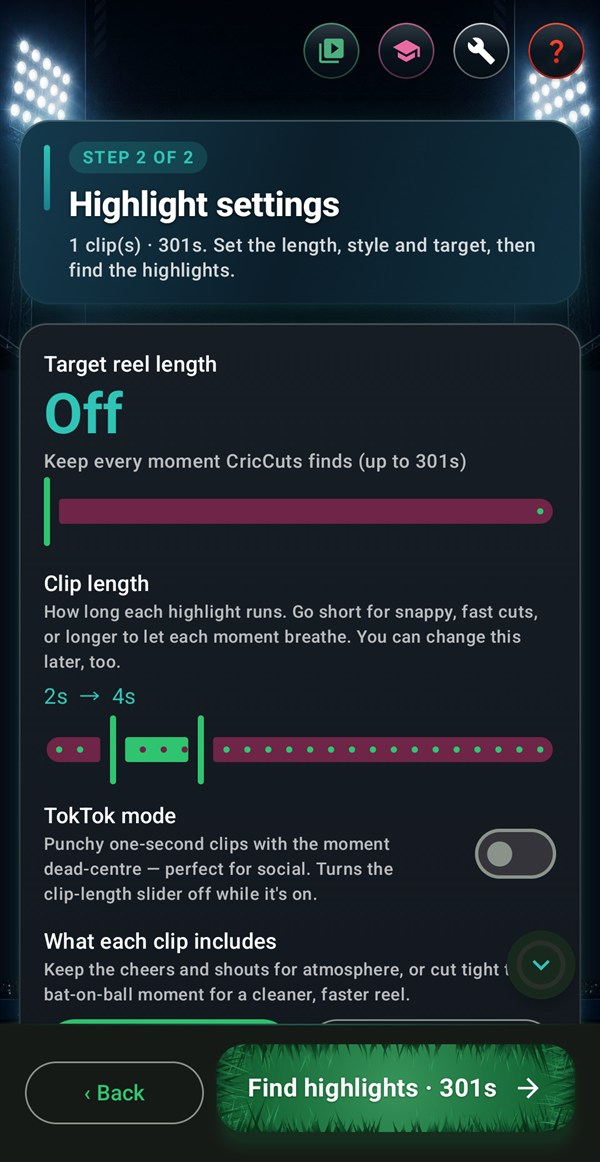
The top of Highlight settings: a "Target reel length" slider set to Off, the clip-length range, and the TokTok mode toggle.
STEP 04 · GETTING STARTED

Set how long your reel runs

Drag the target-length slider and CricCuts keeps the highest-scoring moments that fit your time, and skips the weaker ones. Leave it off to keep everything it finds. You can change this any time later, too.

  • Set a target — your best moments are fitted to it
  • Off = keep every moment CricCuts finds
  • A longer target means more clips in the reel
  • Change it later in Tools → Auto-trim

Finding highlights

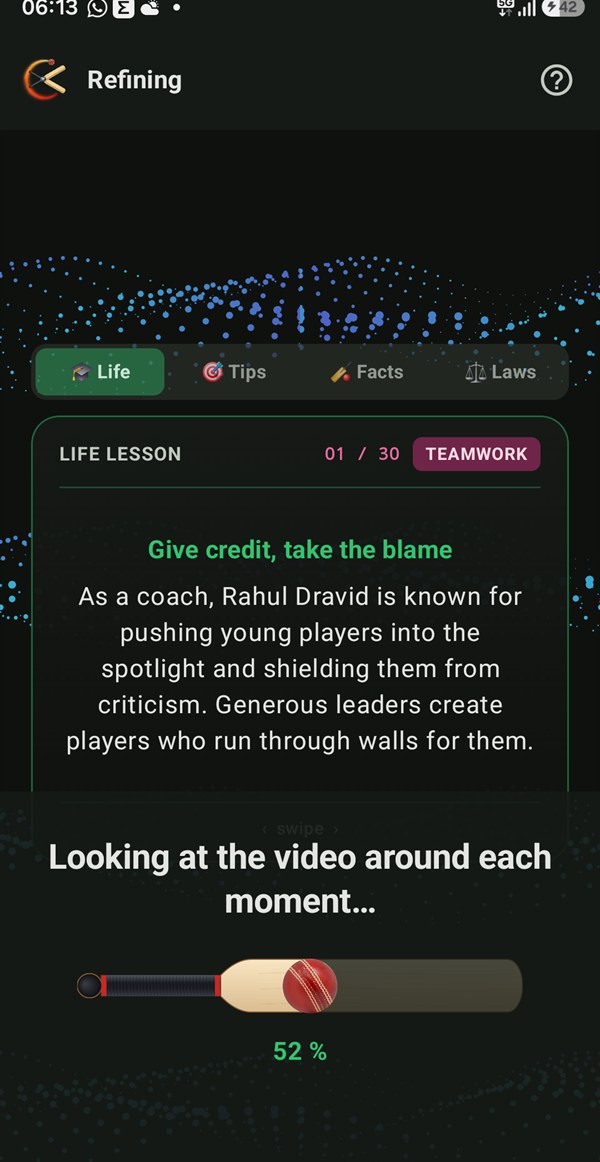
Working on your match…
STEP 05 · FINDING HIGHLIGHTS

CricCuts finds the moments

First CricCuts listens for the tell-tale sounds of a real moment — bat on ball, the run-up, the appeals and the cheers. Then it hands over to you to box the batter, and goes back for a second look at the video around each moment. It all runs on your phone, so nothing is ever uploaded. Sit tight for a minute or two — or swipe through Life, Tips, Facts and Laws from the Academy while you wait.

  • Listens for shots, appeals and reactions
  • Then you box the batter — and it takes a second look
  • Runs entirely on your phone — fully private
  • Browse Life, Tips, Facts or Laws from the Academy while you wait
  • Sit tight for a minute or two
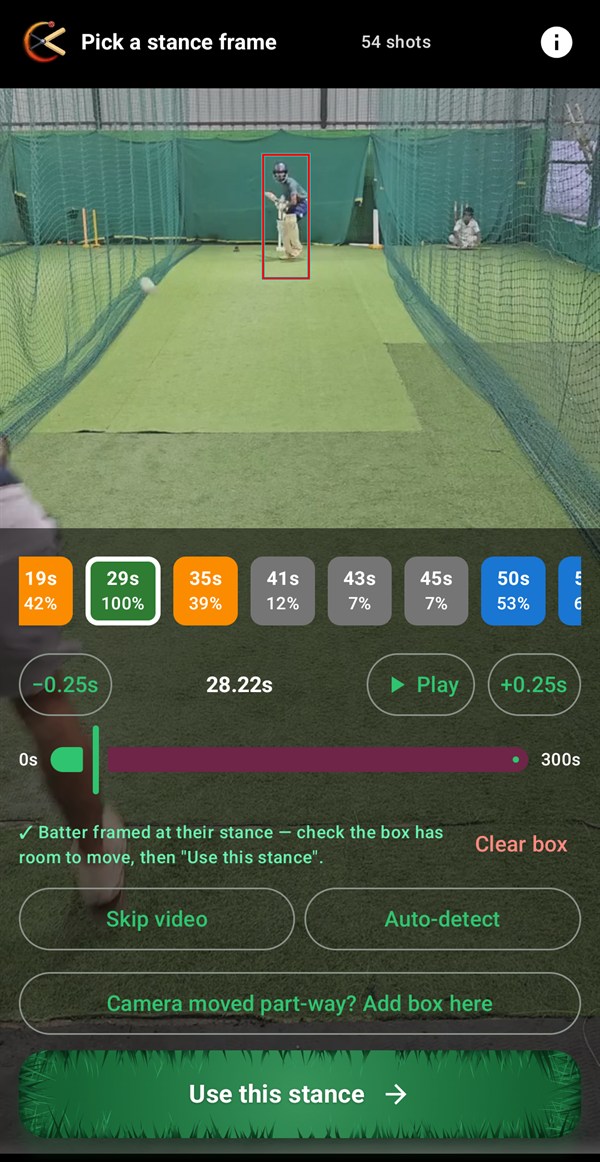
The box screen: CricCuts has landed on the batter's stance and drawn a tall box around them, asking "Batter found — use this box?" with Dismiss and Confirm box.
STEP 06 · FINDING HIGHLIGHTS

Box your batter

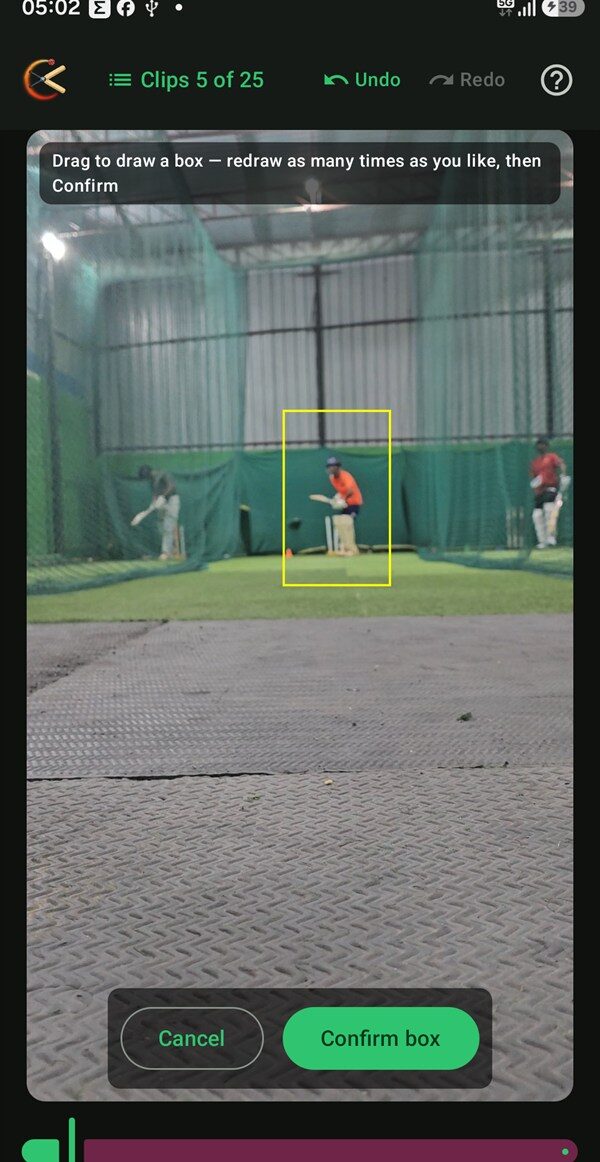
CricCuts jumps to your batter's stance at the first real delivery and draws a box around them for you — usually you just check it and tap Use this stance.

Keep it tall and upright, on the whole batter head to toe, with room to move in the crease. Don't let it get wide: a wide box drags in the next net and the bowler's run-up, which shrinks your batter and makes them harder to read. Snug on the sides, roomy top to bottom.

On multi-net footage a box is required, and a blind auto-detect has too many batters to choose from. If it can't find yours, draw a rough box around the general area yourself — it's fine if the bowler or the next net creeps in — then tap Auto-detect again: it fits a tight, padded box on your batter specifically within the area you drew.

  • It lands on the stance and draws the box for you
  • Drag to adjust — tall and upright beats wide
  • Auto-detect has another go; ± 0.25s finds a clearer frame
  • Skip box — analyze full frame works on single-batter footage
  • Multi-net: draw a rough box around the area — Auto-detect fits a tight box on your batter inside it
  • If you can hear other bats, a box is required — it's how yours is kept
  • Skip video drops back to sound only

The one that matters. Tight in width, generous in height. This single choice does more for your reel than any other setting in the app.

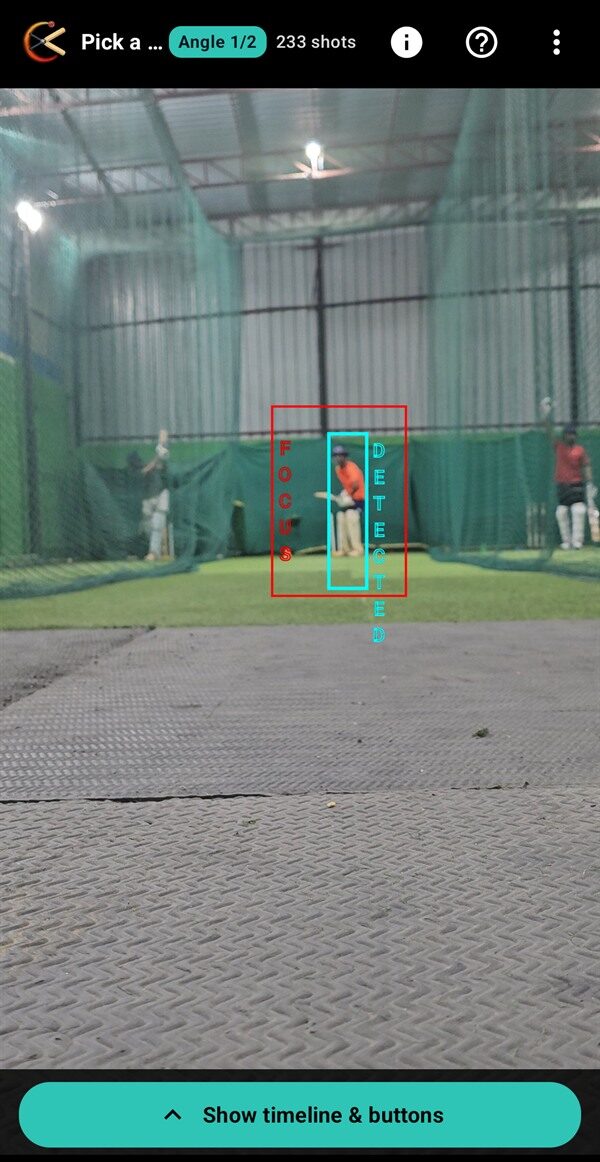
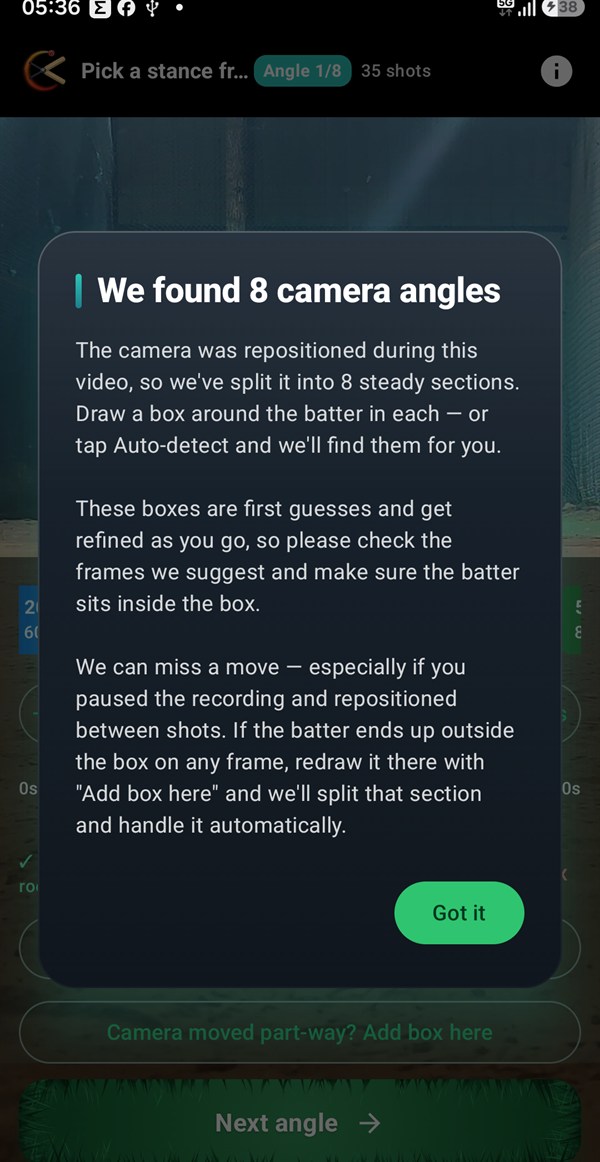
The "We found 8 camera angles" dialog explaining the video was split into steady sections, with a Got it button, over the box screen.
STEP 07 · FINDING HIGHLIGHTS

Camera moved? Handled — but give it a check.

If the phone got moved, bumped or re-aimed mid-recording, CricCuts notices and splits the footage into steady sections — you'll see "We found 2 camera angles", one box per angle (marked Angle 1/2 at the top). When the batter is still inside the box from the last angle it offers to reuse it — one tap on Confirm box, and confirming auto-advances you straight to the next angle. If the batter moved enough that the carried-over box no longer fits, CricCuts usually catches that itself and quietly draws a fresh box for you to check — "Camera moved — the old box didn't fit, so I drew a fresh one" — no action needed beyond confirming it. Spot a mistake on one you already did? A back arrow at the top of the screen takes you back to redraw it.

These boxes are first guesses that get refined as you go, so check each one: scrub the frames it suggests and make sure the batter actually sits inside the box. A move can slip past the detector — especially if you paused the recording and repositioned between shots, which leaves no gradual motion to catch. If the batter lands outside the box anywhere, redraw it there with the "Camera moved part-way? Add box here" button and CricCuts splits and re-tracks that section for you.

  • Camera moves are found for you — nothing to turn on
  • One box per angle — confirming auto-advances to the next
  • The boxes are first guesses, refined as you go
  • A stale carried-over box is caught and redrawn automatically — just check it
  • Missed a move? Redraw with "Camera moved part-way? Add box here" — it auto-splits that section
  • Reuse the last box in one tap; the back arrow revisits and redraws an earlier angle
  • Skip angle passes one; Skip video drops video entirely

Review & tune

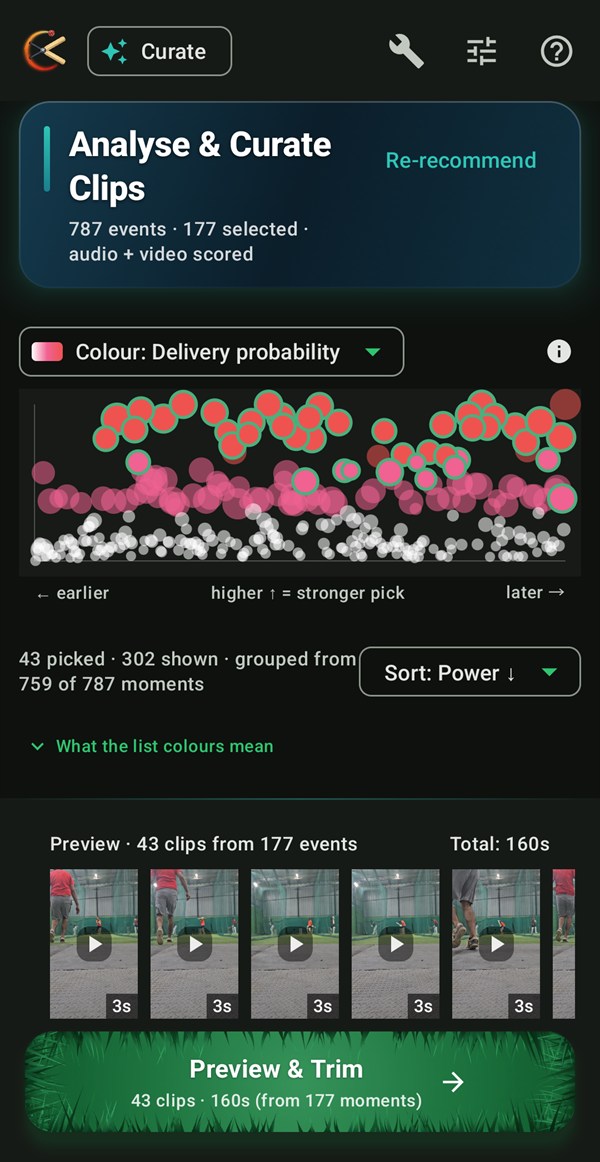
The Analyse & Curate Clips screen: a scatter graph of every moment, coloured by delivery probability, above a strip of clip previews and a Preview & Trim button.
STEP 08 · REVIEW

Analyse & curate your clips

This is where you shape the reel. The graph plots every moment CricCuts found — each dot is a delivery: the higher it sits the stronger a pick it is, the bigger it is the harder the ball was hit, and a green ring means it's already in your reel. Colour the dots by Delivery probability, Beaten chance or Overall score. Below the graph the same moments are cards you tick or untick, each with a % badge for how likely it's a real delivery. Curate sits in the top bar, one tap away whenever you want to find more or filter out the weakest. Tap Re-recommend after big changes to re-fit the auto-picks.

  • The graph maps every moment — higher = stronger pick
  • Bigger dot = harder-hit; green ring = already in your reel
  • Colour by Delivery probability, Beaten chance or Overall score
  • Cards below carry a % "real delivery" badge — tick to keep
  • Best picks are pre-ticked to your target length
  • Curate — always one tap away in the top bar
  • Re-recommend re-fits the auto-picks after big changes
The Tools menu on the Review screen
STEP 09 · REVIEW

Everything under Tools

Tap the Tools button on the Review screen for the power features: run the video analysis again (or point out the batter, if you skipped video earlier), tag clips by the commentary, set clip length and TokTok, or switch Batter mode if you're now hearing another net. Changing clip range or content rebuilds clips in place — your manual picks always survive. (Curate has its own button in the top bar — see the previous step.)

  • Run video analysis — or re-do your batter box
  • Commentary keyword tagging
  • Batter mode — Only my batter, or I can hear others
  • Per-clip length & TokTok mode
  • Only action vs Include vocals
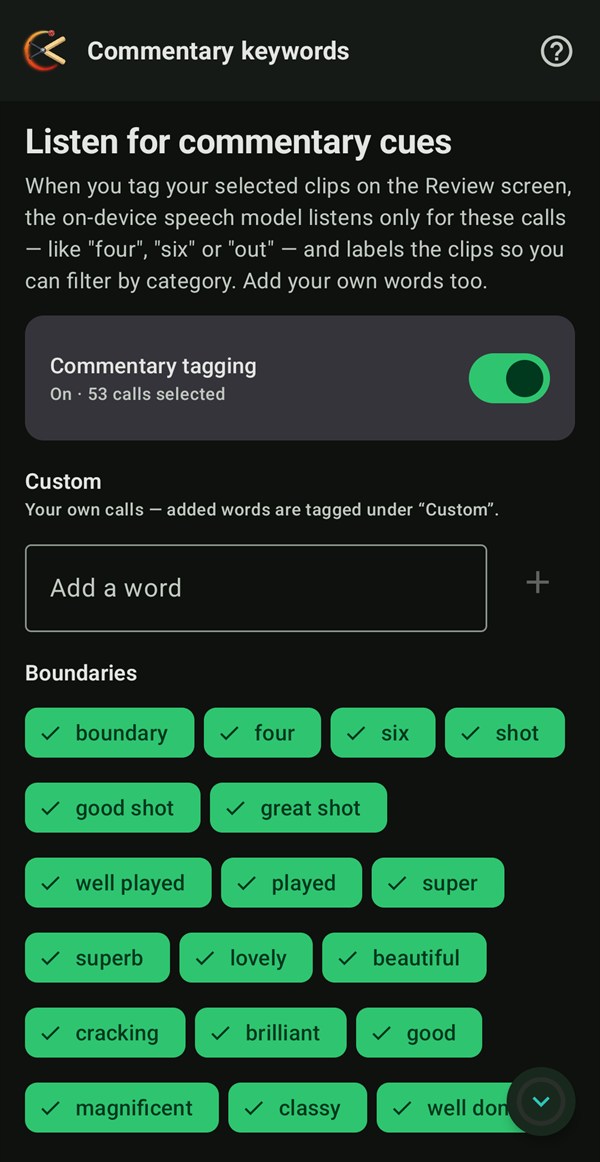
Choose the calls to listen for
STEP 10 · REVIEW

Tag clips by the commentary

CricCuts can listen to the commentary around your clips and tag each one by what was called — "four", "six", "out" and more — then let you filter down to just the boundaries, the wickets, or whatever you're after. It runs on your phone, only when you ask.

  • Tag your selected clips, or every clip shown
  • Sorted into Boundaries, Runs, Wickets & Bowling
  • Add your own words to listen for
  • Then filter the list by category
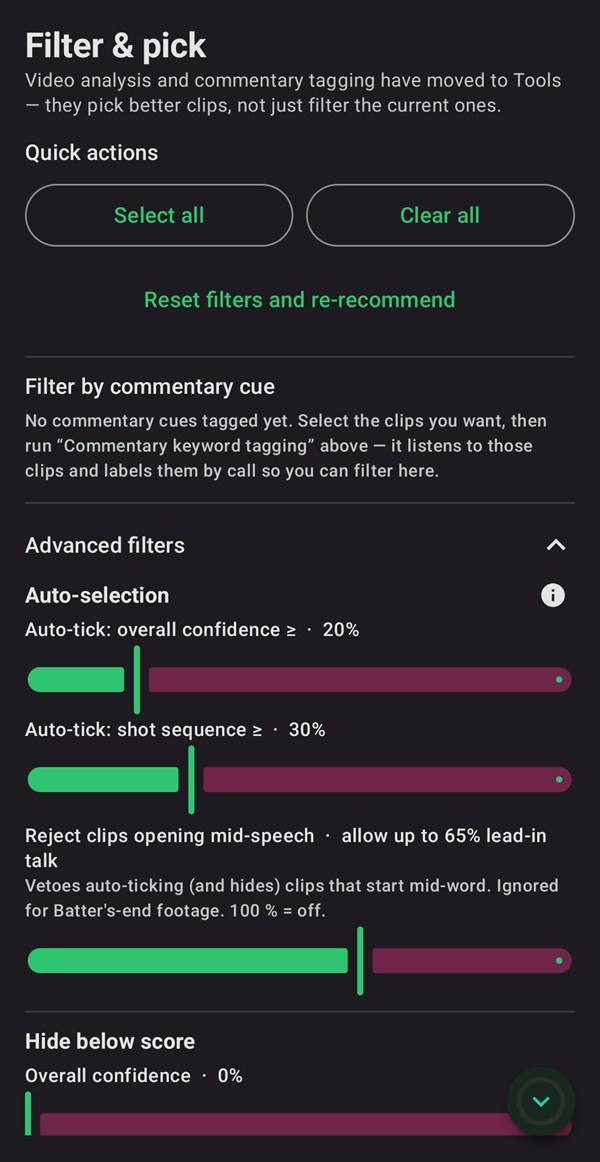
Quick actions, auto-selection and score filters
STEP 11 · REVIEW

Filter & pick the top moments

Open Filter & pick to narrow what's shown. Select all or Clear all in a tap, filter by commentary category, or hide anything below a confidence, Power, Appeal or Motion level. "Pick top N" grabs the strongest moments in one go, and under Advanced, Auto-selection sets how strong a moment must be to get auto-ticked.

Video analysis and keyword tagging now live under Tools — they find better clips, rather than just filtering the ones you already have.

  • Select all / Clear all in a tap
  • Hide below a score — confidence, Power, Appeal, Motion
  • Filter by commentary category
  • "Pick top N" grabs the strongest fast
  • Auto-selection: how strong a moment must be to auto-tick
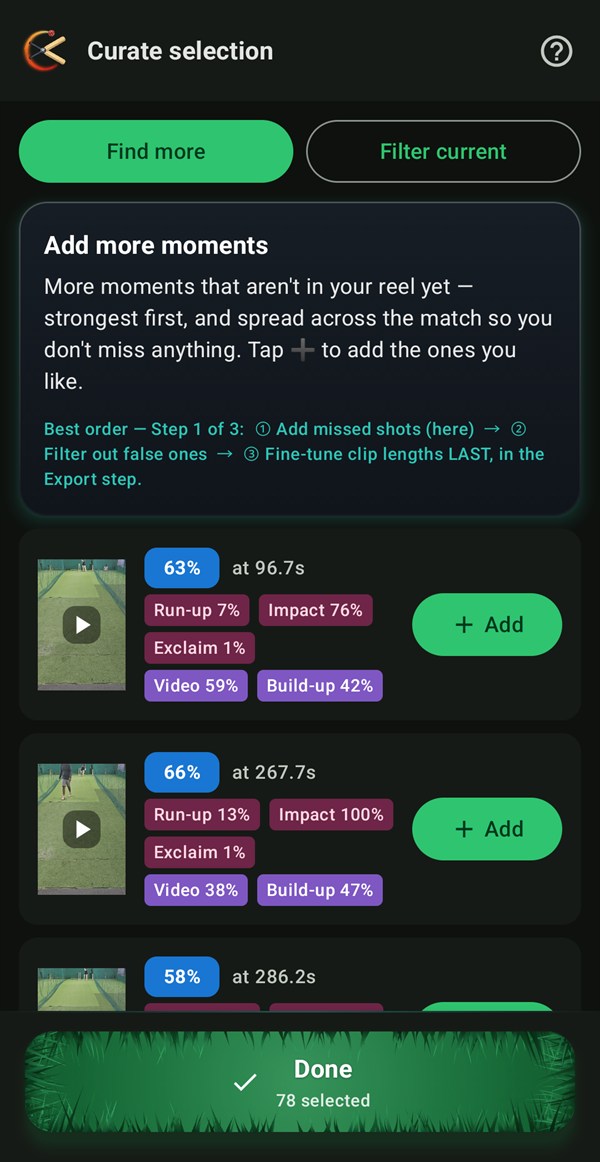
Find more, or filter out the weakest
STEP 12 · TUNE TO TASTE

Teach it your idea of a highlight

Switch between Find more (add strong moments not yet in your reel) and Filter current (review your weakest picks for removal). Tap a card to preview and trim it, then Add or Remove right there — a few taps re-rank the rest to your taste. Stop whenever you like; even a few helps.

  • Find more, or Filter current
  • One card per moment — same-shot clips grouped
  • Tap a card to preview, trim, add or remove
  • Undo/Redo take back an add or remove
  • Stop any time — even a few helps

Polish

Trim, reorder and preview
STEP 13 · POLISH

Fine-tune each clip

Watch the whole reel back to back, then perfect it. Nudge where any clip starts and ends, reorder them by time, delivery probability, power or beaten chance, or drop one — a "now playing" marker shows which clip is on screen so you always know what you're trimming. Tap the full-screen icon for a bigger canvas — handy for fiddly work like drawing a focus box precisely.

  • Preview the full reel end to end
  • Drag the handles to trim any clip ±2s
  • Reorder by Time, Delivery probability, Power or Beaten chance
  • Full-screen icon → a bigger canvas for trimming and drawing a focus box
  • Open the Clips sidebar for the full list
  • Undo/Redo any edit
Auto-trim to a target, or TokTok cuts
STEP 14 · POLISH

TokTok mode & auto-trim

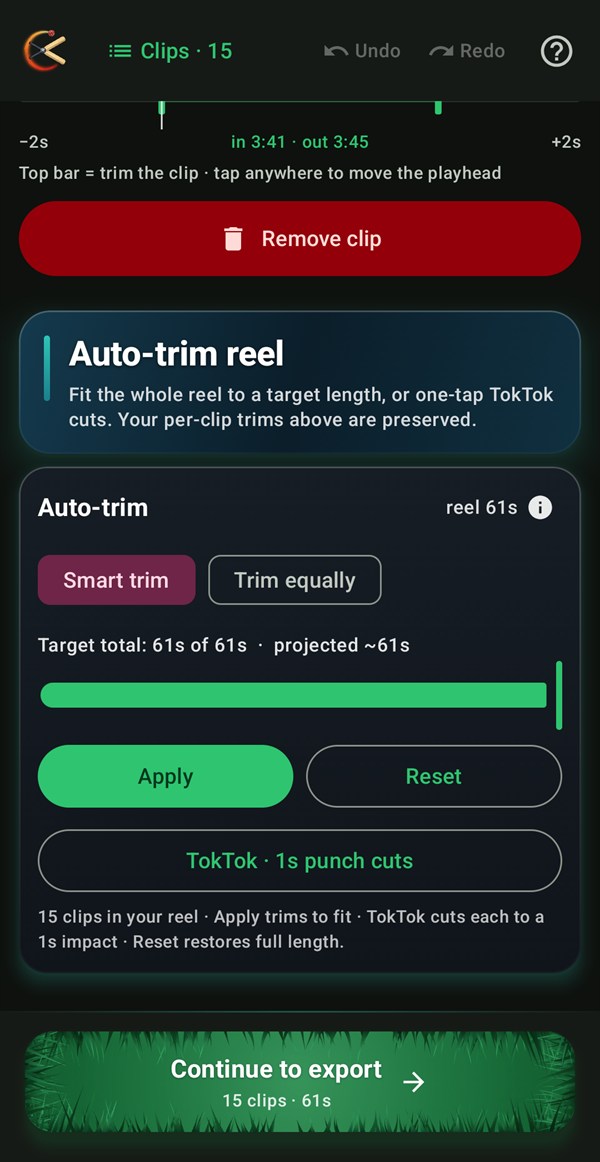
Auto-trim fits the reel to a target length — Smart trim shortens the longest clips first, or Trim equally shares the time evenly. Or tap TokTok for punchy one-second cuts with the impact dead-centre — the fast-cut social reel in one tap. Reset restores the natural cut any time.

  • Auto-trim to a target length in one tap
  • Smart trim, or Trim equally
  • TokTok — every clip ~1s, impact centred
  • Reset back to the natural cut any time
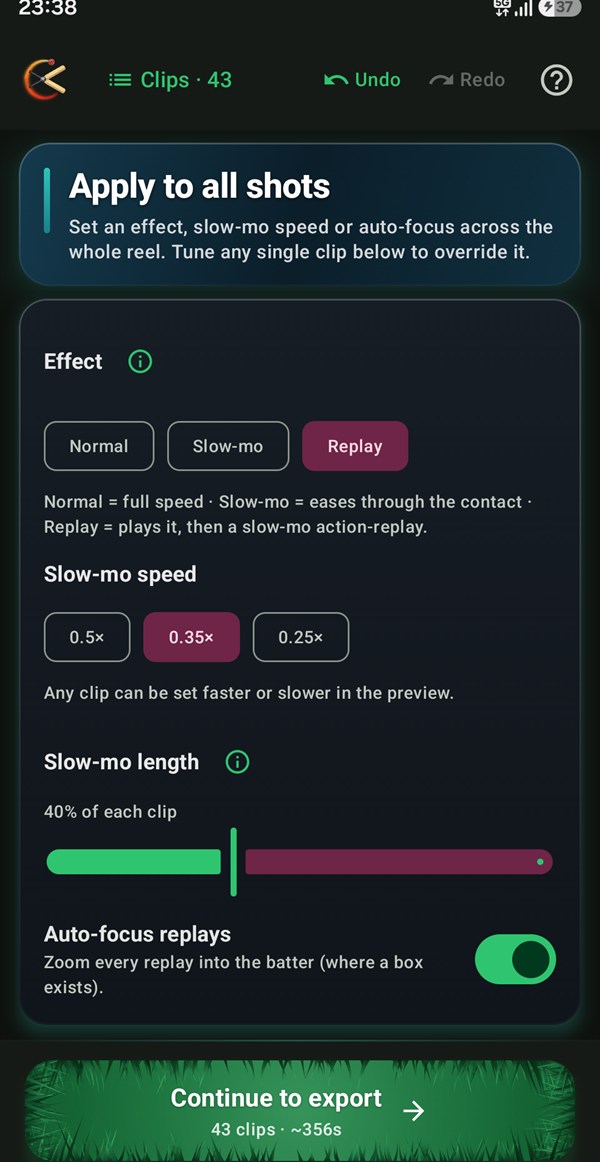
The Effect control · Normal · Slow-mo · Replay
STEP 15 · POLISH

Slow-mo & instant replay

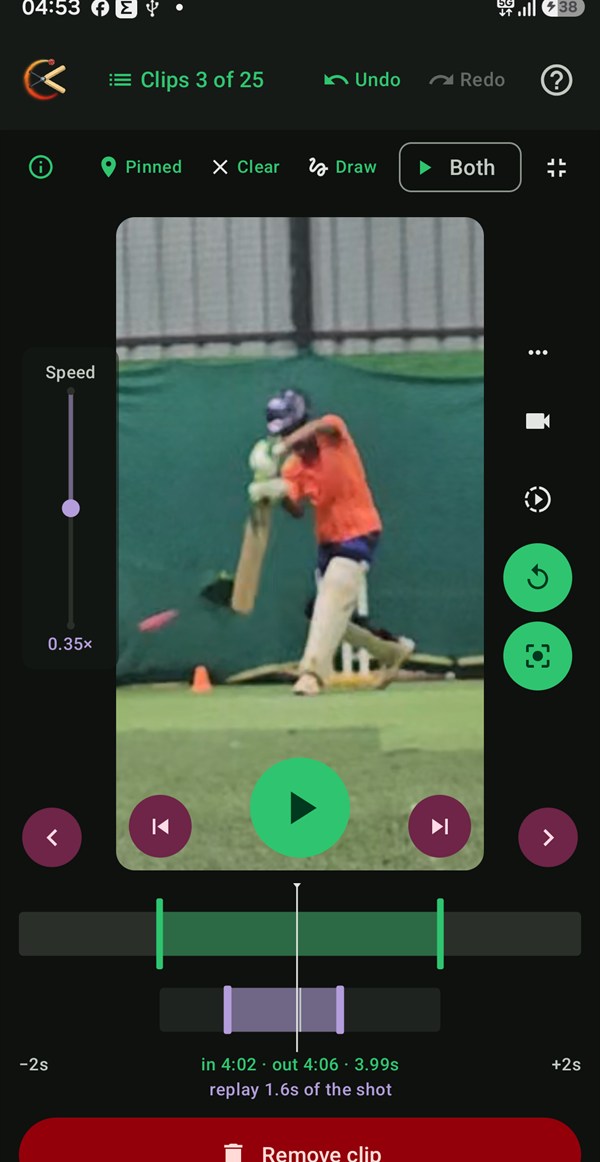
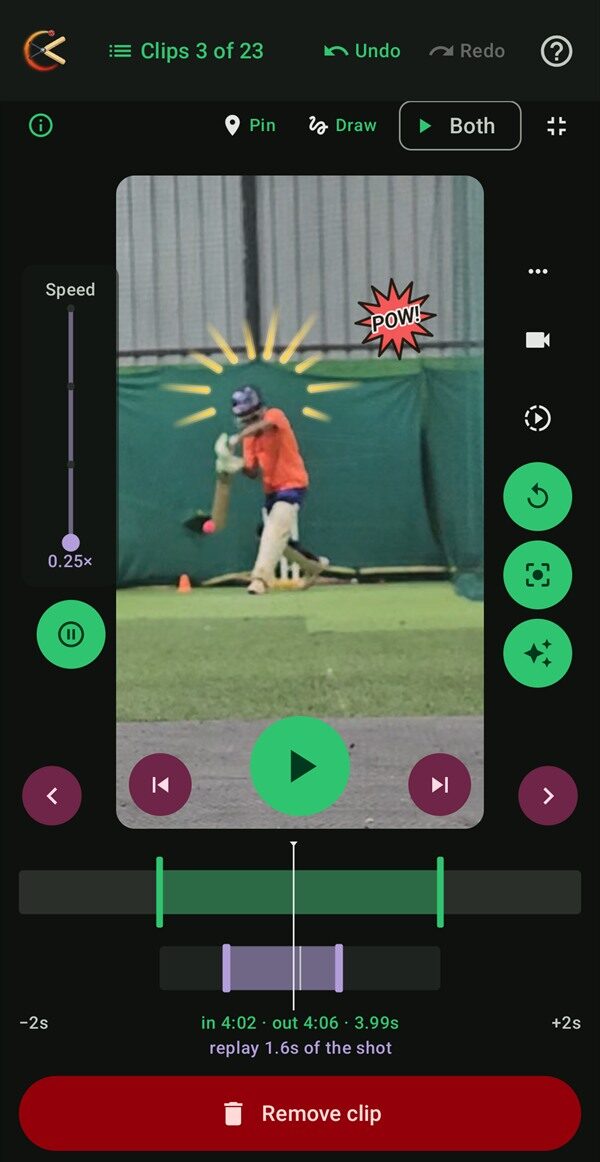
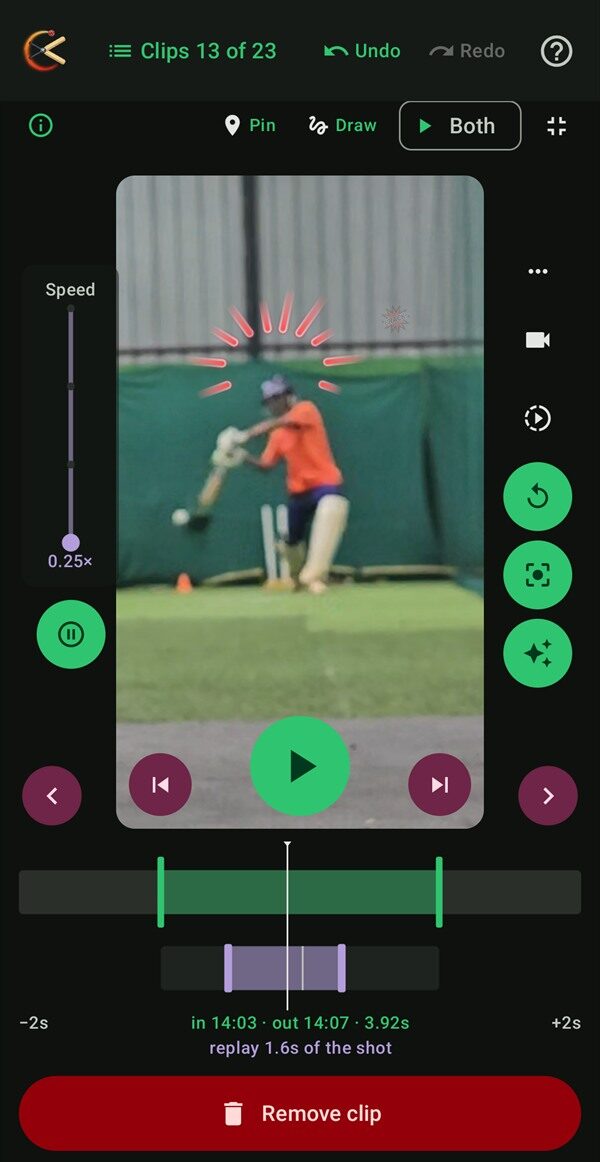
Give the big shots the slow-motion treatment. Under the Effect control on the Review & Trim screen — tap Apply to all shots, or set it per clip — pick Slow-mo to ease the video through the moment of contact and speed back up, or Replay to play the shot and then an action-replay of the contact in slow motion.

Choose how slow with Speed (0.5×, 0.35× or 0.25×) — reel-wide under Apply to all shots, or with that clip's own slider beside the preview — and how much of each clip slows with the Slow-mo length slider — drag it to 100% to slow or replay the whole clip. It applies reel-wide; drag the teal band under any single clip afterwards to fine-tune just that one. Turn on Auto-focus replays to zoom each replay into your batter. Effect icons sit beside the preview — tap "…" to reveal their labels — or tap Apply to all shots to give every clip the same treatment at once.

If a replay zooms into the wrong thing, use that clip's Pin and Draw buttons, shown above the preview whenever it's set to Replay: Pin re-targets the zoom to whatever frame you've scrubbed to (it becomes "Pinned", with a Clear button to undo), and Draw lets you draw the zoom box by hand when nothing auto-detects.

  • Normal, Slow-mo or Replay — icon buttons beside the preview
  • Speed — 0.5×, 0.35× or 0.25×, reel-wide or per clip
  • Slow-mo length — how much of each clip slows, reel-wide
  • Drag the teal band to fine-tune a single clip
  • Replay adds a slow-motion action-replay of the contact
  • Auto-focus replays zooms the replay into your batter
  • Pin re-targets the zoom to the paused frame, or Draw your own box
  • "Apply to all shots" sets every clip in one tap
  • Looks smoothest on 60fps+ footage

Previews live, baked in on export. The preview plays the slow-mo and replay for real, so you see exactly what you'll get — and they're rendered into the file when you export, so the finished reel runs a little longer than the trimmed clips.

Save & share

Presets, aspect ratio & resolution
STEP 16 · SAVE & SHARE

Shape it for any platform

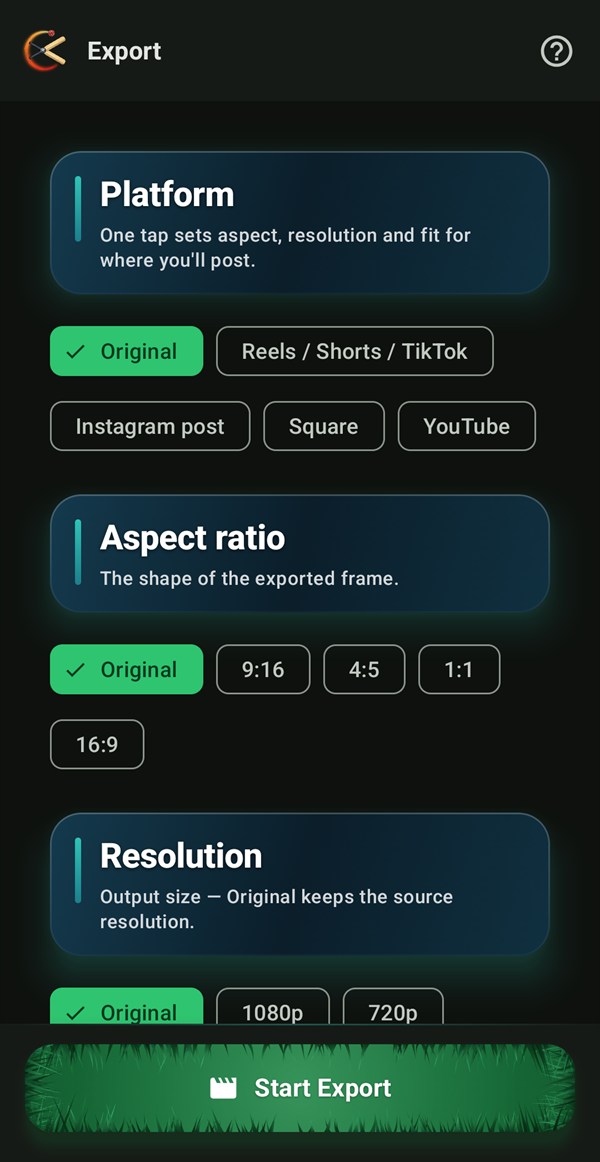
Pick a platform preset — Reels / Shorts / TikTok, Instagram post, Square, YouTube, or Original to keep your footage exactly as you shot it. Or set the aspect and resolution yourself.

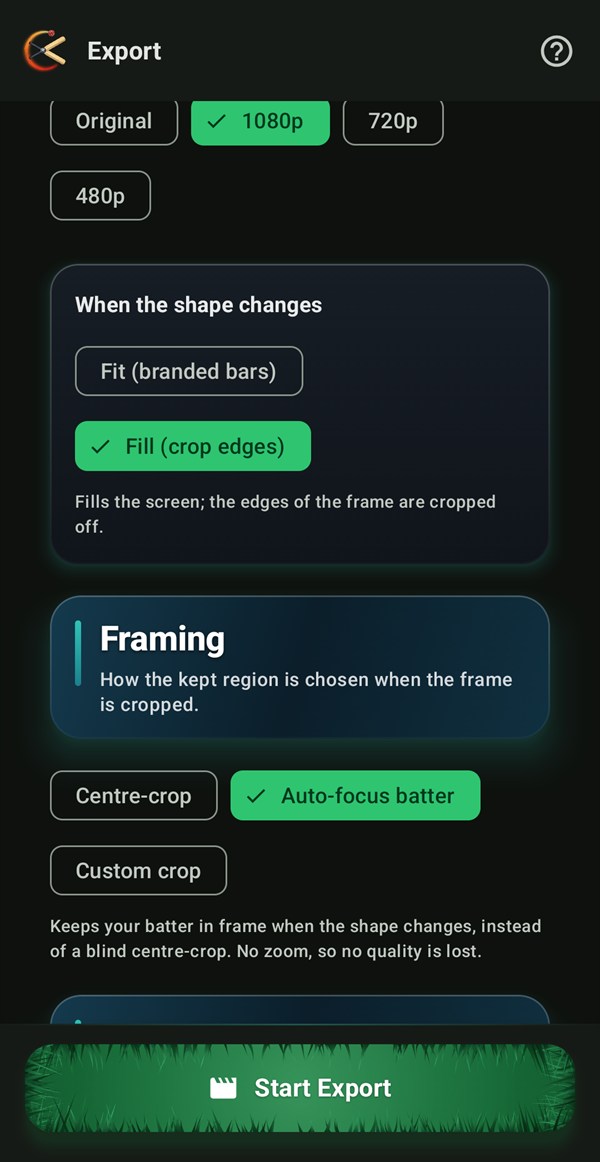
Once the shape changes you choose what gives: Fit (branded bars) keeps the whole picture and fills the gaps with your logo, Fill (crop edges) fills the screen and trims the sides.

  • Presets: Original · Reels / Shorts / TikTok · Instagram post · Square · YouTube
  • Or set aspect (9:16, 4:5, 1:1, 16:9) & resolution yourself
  • Fit keeps everything and adds branded bars
  • Fill fills the screen and crops the edges — see Framing next
  • Saved to Movies/CricCuts
Framing · Centre-crop · Auto-focus batter · Custom crop
STEP 17 · SAVE & SHARE

Auto-focus & cropping

Filmed landscape, posting vertical? Something has to be cut — Framing decides what.

Auto-focus batter is on by default and keeps your batter in the picture instead of blindly cropping the middle, with no zoom at all, so you lose no quality. It only has something to do once Fill is actually cropping the edges — on Fit, or at Original shape, nothing is being cut, so it makes no difference.

Want to decide yourself? Custom crop lets you draw the keeper, per camera position. Everything inside your box is guaranteed to survive, and the dashed frame shows exactly what will be exported.

  • Auto-focus batter — on by default, no zoom, no quality lost
  • It applies when Fill crops the edges of a new shape
  • Centre-crop takes the middle, whatever's there
  • Custom crop → "Set crop per camera position →"
  • Drag a box; the dashed frame is exactly what exports
  • Watch the zoom readout — past 2× it warns it'll look soft

Custom crop is the only mode that zooms. The other two keep the full-size window and just decide where to put it — which is why they never cost you any quality.

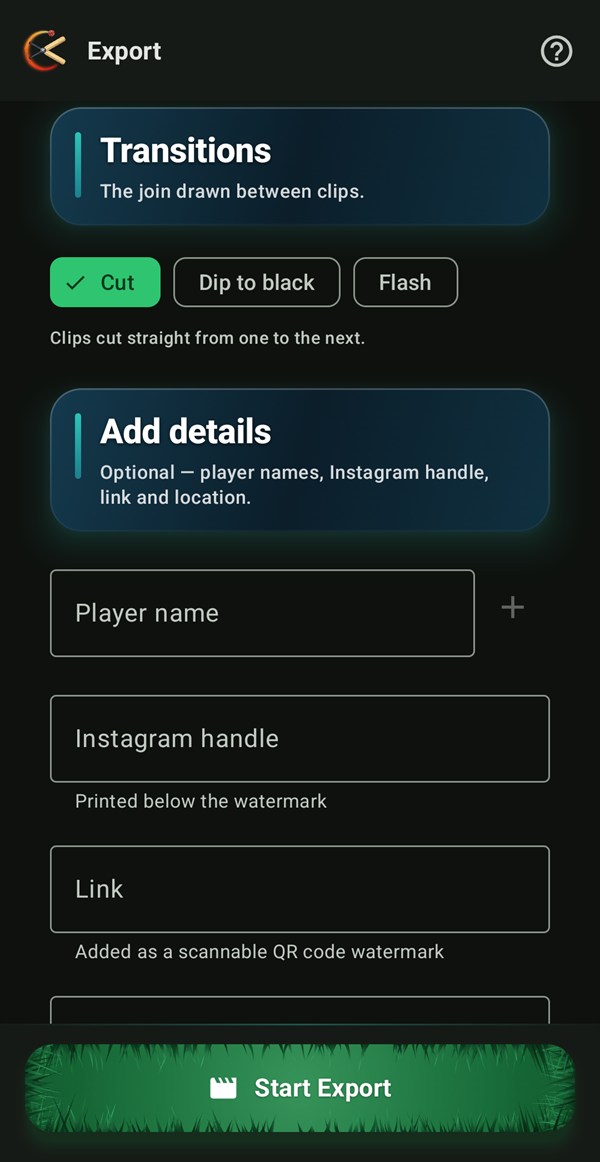
Transitions · Cut · Dip to black · Flash
STEP 18 · SAVE & SHARE

Transitions between clips

Choose how one shot joins the next. On the export screen, Transitions gives you a straight Cut, a Dip to black that fades through black between clips, or a Flash of white for a punchy, sport-highlights look. The choice applies across the whole reel.

  • Cut — clips join straight, no effect
  • Dip to black — a gentle fade between clips
  • Flash — a quick white flash, highlights-style
  • Set once, applied across the whole reel
  • Near-instant to render — adds no real export time
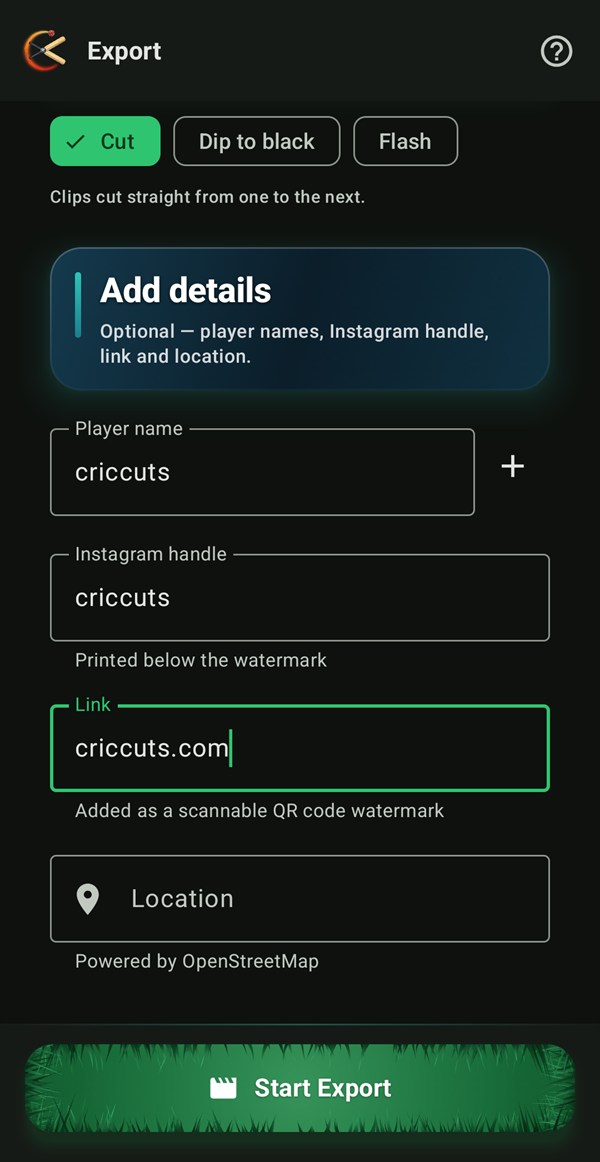
Handle, QR link, players & location
STEP 19 · SAVE & SHARE

Brand it, then share

Add your Instagram handle to print under the watermark, drop in a link and CricCuts turns it into a scannable QR code on the reel, and tag the ground or the players. Then export and share straight to Instagram, YouTube, WhatsApp or anywhere else.

  • Instagram @handle prints below the watermark
  • A link becomes a scannable QR code on the reel
  • Tag players and the location
  • Export, then share anywhere in a tap
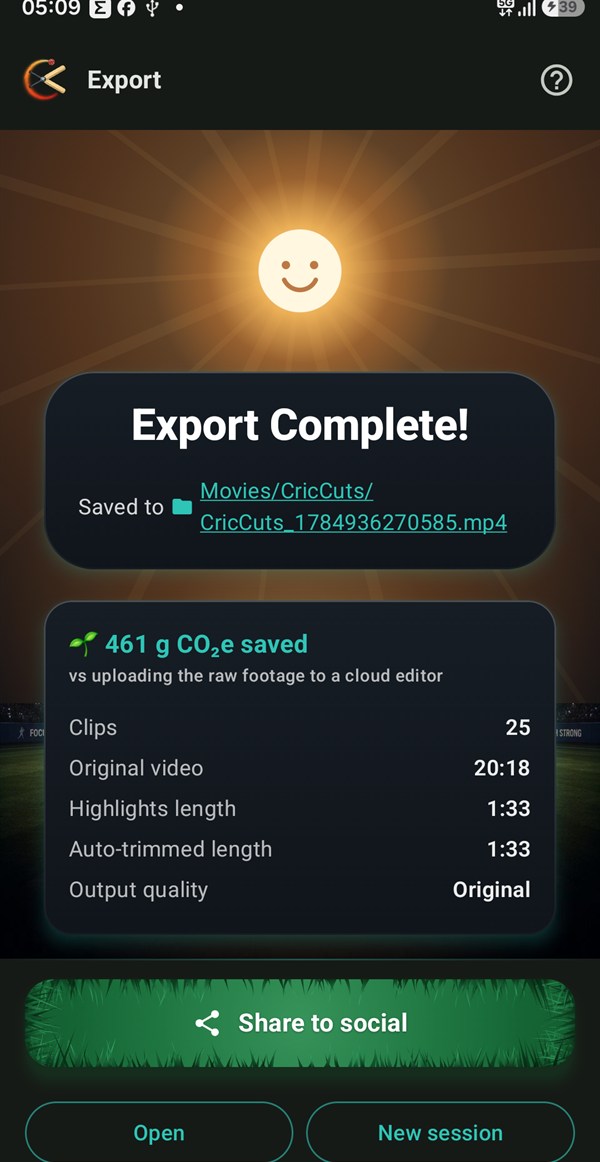
Export Complete — clips, lengths, output quality and CO2e saved
STEP 20 · SAVE & SHARE

Export Complete — your reel's stats

Once it's done, CricCuts shows a quick summary: clip count, original video length, highlights length, auto-trimmed length and output quality — plus a CO₂e saved estimate, a rough measure of the emissions avoided by cutting on your own phone instead of uploading the raw footage to a cloud editor. From here, share straight to social, open the file, or start a new session.

  • Clips, original video length, highlights length, auto-trimmed length & output quality
  • CO₂e saved — avoided emissions vs. a cloud editor
  • Share to social, Open, or New session

Still stuck?

The FAQ covers the questions this guide doesn't — how to film, adjacent nets, fixing a bad pick, battery and privacy.